Rust userspace application for QEMU custom peripherals
- 10 Jul, 2025
After working with C, C++ and Python for more than 15 years, I got the opportunity to work with Rust at my current workplace (while still working primarily on Yocto and Linux).
It has been a pleasant ride (so far 😅), so I wanted to try a bit of Rust in my free time as well, both for Linux userspace applications and for baremetal applications (comming soon™).
The goal of this post is to demonstrate a Rust userspace application that can interact with all three custom QEMU peripherals presented so far on the MistraSolutions blog: Memory-mapped, I2C and SPI peripherals. The application replicates the functionality of the individual C++ userspace applications created in the respective posts, but it also handles data from all of the sensors at the same time.
The following things will be covered in this post
Rust userspace application
As mentioned in the introduction, the goal of this post is to have a Rust application that will interact with all three custom QEMU peripherals at the same time.
The task creation and handling will be done using async runtime in Rust.
Tip
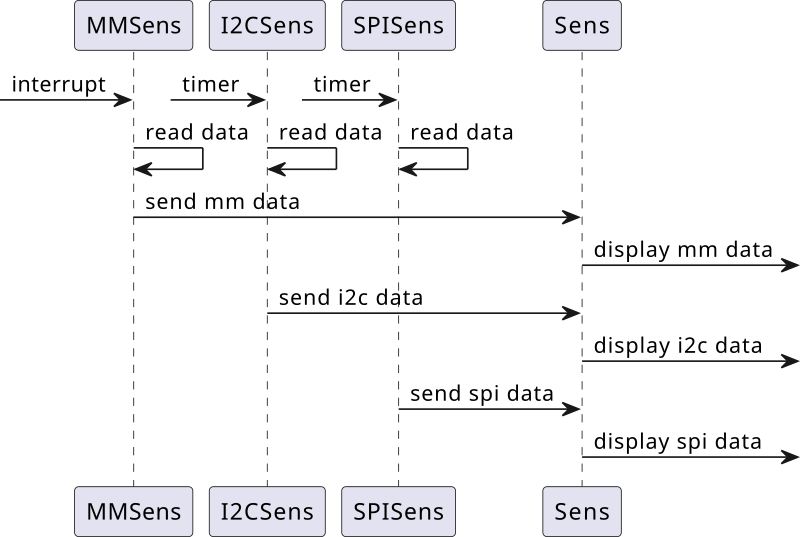
The application is organized as three separate tasks that interact with individual peripherals and submit measured data using a common channel to the fourth task that prints the received data to stdout.
The implementation of the Rust application can be found in
sens-apps-rs github repository.
smol async runtime
Smol async runtime is a collection of several crates providing various features. smol
provides Executors that can be multi-threaded and are used to spawn individual tasks.
Some of the crates that
were used will be described in this subsection.
There are examples in smol documentation on creating
an Executor and spawning tasks onto it, but it has a lot of boilerplate code. However, as indicated in the smol
documentation, smol-macros simplify creating a multi-threaded Executor and
spawning tasks onto it to run concurrently.
Since the sensor tasks are independent and should run indefinitely, they are detach’ed instead of await’ed after
creation (as suggested in the official
documentation).
Communication between tasks is needed to pass data, so async-channel is used for communication between individual sensor (daemon) tasks and the main task.
Note
There was no need for bidirectional communication in this example so only one channel is used.
In order to make a more realistic example, Ctrl+C (SIGINT) handling is added, where the main signal handler will send a broadcast message (using async-broadcast) to each thread that interacts with a sensor, so they can gracefully stop the peripheral.
The tasks are implemented as infinite loops and are periodically woken up to execute, which also allows periodic check of the SIGINT reception.
Info
I could not find an equivalent to tokio::select which would work with futures with different return values, so I
opted for this sequential approach. This means that Ctrl+C will be processed in individual tasks after the task is
periodically woken up.
I expect this could have been handled by adding another layer of handler tasks, which would convert SIGINT
reception and periodic wakeup into a variant of a message that can be sent over a channel, so a single await could be
used to handle both events, but that was out of scope of this post.
Sensor trait
Looking at all three individual C++ applications, certain patterns are obvious:
- We want to initialize the peripheral by setting correct register values (
initfunction), then - perform reading in a loop (
runfunction) with some delay (either HW or SW generated) and, - once application should be closed, we want to deinitialize the peripheral (
deinitfunction), in order to have it ready for another application start.
We can apply the same approach for the Rust application, but in this case we can create a Sensor trait, which will
define all the functions an individual sensor struct will have to implement.
pub(super) trait Sensor {
    async fn spawn(
        ex: &smol_macros::Executor<'_>,
        sender: async_channel::Sender<UpdateMessage>,
        ctrl_c_receiver: async_broadcast::Receiver<()>,
    ) -> anyhow::Result<()>;
    async fn init(&mut self) -> anyhow::Result<()>;
    async fn deinit(&mut self);
    async fn run(self);
}
The spawn function was not mentioned in the previous analysis. The purpose of this function is to create and
initialize the individual sensor structure, and then spawn and detach task.
Memory-mapped sensor polling
The Memory-mapped sensor implementation is different from the I2C and SPI sensors since it generates an interrupt every time a new sample is available. The data generation is periodic, so there is no need for a software timer to drive the reading and application can wait for the interrupt to arrive before doing anything.
The interrupt is exposed via sysfs interface and a file that has to be polled. In smol there is the
polling crate which provides the interface towards the poll syscall.
Note
I couldn’t find an official example of polling a file descriptor, so the solution that is shown is made to the best of my abilities, and it works for my use case. There might be better ways to do this.
I had to experiment a bit, and the first solution that worked was enabling an Edge triggered source, without clearing it manually (even though it is suggested in the documentation).
...
  let poller = Poller::new().unwrap();
  let file = File::open(Path::new(MMSENS_PATH).join(INTERRUPT_ATTR))
    .await
    .expect("Could not open interrupt file");
  unsafe {
    poller
      .add_with_mode(&file, Event::readable(MMSENS_EV), polling::PollMode::Edge)
      .expect("Could not add file to poller")
  };
  let mut events = Events::new();
  loop {
    events.clear();
    poller
      .wait(&mut events, Some(std::time::Duration::from_millis(500)))
      .expect("Poll failed!");

    for ev in events.iter() {
      if ev.key == MMSENS_EV
            // read data and send it
      }
    }
  }
...
I2C and SPI interaction
For I2C and SPI it is easier, since there are crates for userspace I2C and SPI interaction. The crates enable interaction with I2C and SPI clients using the i2cdev and spidev interfaces, as was done in the C++ examples.
- I2C
- SPI
impl Sensor for I2CSens {
async fn spawn(
ex: &Executor<'_>,
sender: Sender<UpdateMessage>,
ctrl_c_receiver: Receiver<()>,
) -> anyhow::Result<()> {
let i2c_device = LinuxI2CDevice::new(I2C_PATH, I2CSENS_ADDR)?;
let mut i2csens = Self {
sender,
ctrl_c_receiver,
i2c_device,
};
i2csens.init().await?;
ex.spawn(i2csens.run()).detach();
Ok(())
}
}
impl I2CSens {
async fn read_reg(&mut self, reg_nr: I2CReg) -> anyhow::Result<u8> {
let mut read_data = [0; 1];
let reg = [reg_nr as u8];
let mut msgs = [
LinuxI2CMessage::write(®),
LinuxI2CMessage::read(&mut read_data),
];
self.i2c_device
.transfer(&mut msgs)
.map(|_| read_data[0])
.map_err(|e| e.into())
}
async fn write_reg(&mut self, reg_nr: I2CReg, value: u8) -> anyhow::Result<()> {
let reg = [reg_nr as u8, value];
let mut msgs = [LinuxI2CMessage::write(®)];
self.i2c_device
.transfer(&mut msgs)
.map(|_| ())
.map_err(|e| e.into())
}
}impl Sensor for SPISens {
async fn spawn(
ex: &Executor<'_>,
sender: Sender<UpdateMessage>,
ctrl_c_receiver: Receiver<()>,
) -> anyhow::Result<()> {
let mut spisens = Self {
sender,
ctrl_c_receiver,
spi_dev: SPISens::create_spi().unwrap(),
};
spisens.init().await?;
ex.spawn(spisens.run()).detach();
Ok(())
}
}
impl SPISens {
fn create_spi() -> anyhow::Result<Spidev> {
let mut spi = Spidev::open(SPI_PATH)?;
let options = SpidevOptions::new()
.bits_per_word(8)
.max_speed_hz(20_000)
.mode(SpiModeFlags::SPI_MODE_0)
.build();
spi.configure(&options)?;
Ok(spi)
}
async fn read_reg(&mut self, reg_id: SPIReg) -> anyhow::Result<u8> {
let cmd_byte = (reg_id as u8) << CMD_REG_SHIFT;
let tx_buf = [cmd_byte, 0u8];
let mut rx_buf = [0; 2];
{
let mut transfer = SpidevTransfer::read_write(&tx_buf, &mut rx_buf);
self.spi_dev.transfer(&mut transfer)?;
}
Ok(rx_buf[1])
}
async fn write_reg(&mut self, reg_id: SPIReg, value: u8) -> anyhow::Result<()> {
let cmd_byte = ((reg_id as u8) << CMD_REG_SHIFT) | CMD_OP_WRITE;
let tx_buf = [cmd_byte, value];
let mut rx_buf = [0; 2];
{
let mut transfer = SpidevTransfer::read_write(&tx_buf, &mut rx_buf);
self.spi_dev.transfer(&mut transfer)?;
}
Ok(())
}
}impl Sensor for I2CSens {
async fn spawn(
ex: &Executor<'_>,
sender: Sender<UpdateMessage>,
ctrl_c_receiver: Receiver<()>,
) -> anyhow::Result<()> {
let i2c_device = LinuxI2CDevice::new(I2C_PATH, I2CSENS_ADDR)?;
let mut i2csens = Self {
sender,
ctrl_c_receiver,
i2c_device,
};
i2csens.init().await?;
ex.spawn(i2csens.run()).detach();
Ok(())
}
}
impl I2CSens {
async fn read_reg(&mut self, reg_nr: I2CReg) -> anyhow::Result<u8> {
let mut read_data = [0; 1];
let reg = [reg_nr as u8];
let mut msgs = [
LinuxI2CMessage::write(®),
LinuxI2CMessage::read(&mut read_data),
];
self.i2c_device
.transfer(&mut msgs)
.map(|_| read_data[0])
.map_err(|e| e.into())
}
async fn write_reg(&mut self, reg_nr: I2CReg, value: u8) -> anyhow::Result<()> {
let reg = [reg_nr as u8, value];
let mut msgs = [LinuxI2CMessage::write(®)];
self.i2c_device
.transfer(&mut msgs)
.map(|_| ())
.map_err(|e| e.into())
}
}impl Sensor for SPISens {
async fn spawn(
ex: &Executor<'_>,
sender: Sender<UpdateMessage>,
ctrl_c_receiver: Receiver<()>,
) -> anyhow::Result<()> {
let mut spisens = Self {
sender,
ctrl_c_receiver,
spi_dev: SPISens::create_spi().unwrap(),
};
spisens.init().await?;
ex.spawn(spisens.run()).detach();
Ok(())
}
}
impl SPISens {
fn create_spi() -> anyhow::Result<Spidev> {
let mut spi = Spidev::open(SPI_PATH)?;
let options = SpidevOptions::new()
.bits_per_word(8)
.max_speed_hz(20_000)
.mode(SpiModeFlags::SPI_MODE_0)
.build();
spi.configure(&options)?;
Ok(spi)
}
async fn read_reg(&mut self, reg_id: SPIReg) -> anyhow::Result<u8> {
let cmd_byte = (reg_id as u8) << CMD_REG_SHIFT;
let tx_buf = [cmd_byte, 0u8];
let mut rx_buf = [0; 2];
{
let mut transfer = SpidevTransfer::read_write(&tx_buf, &mut rx_buf);
self.spi_dev.transfer(&mut transfer)?;
}
Ok(rx_buf[1])
}
async fn write_reg(&mut self, reg_id: SPIReg, value: u8) -> anyhow::Result<()> {
let cmd_byte = ((reg_id as u8) << CMD_REG_SHIFT) | CMD_OP_WRITE;
let tx_buf = [cmd_byte, value];
let mut rx_buf = [0; 2];
{
let mut transfer = SpidevTransfer::read_write(&tx_buf, &mut rx_buf);
self.spi_dev.transfer(&mut transfer)?;
}
Ok(())
}
}The periodic execution should be implemented using a software timer, so
Timer from smol
async-io is used.
QEMU custom peripherals
The QEMU is prepared for testing the Rust application by applying the patches from the old posts that introduced the custom peripherals.
For running on the QEMU 10.0.2 small changes are needed for the memory-mapped sensor component due to upstream updates, so main branch in the QEMU custom peripherals repository is updated. The other two patches (for custom I2C and SPI peripherals) can be applied without changes.
The order of applying patches should be: memory-mapped, I2C and finally SPI sensor.
Rust cross-compilation
We can try to cross-compile app using the armv7-unknown-linux-gnueabihf toolchain.
The toolchain can be installed using rustup
rustup target add armv7-unknown-linux-gnueabihfBefore it can be used, an arm-none-linux-gnueabihf toolchain needs to be made available so it can be used for linking
object files.
Tip
For instructions on getting the toolchain and making it available follow Getting toolchain from the QEMU Board Emulation post series.
Also, a configuration file needs to be created in the project directory in .cargo/config.toml with the following
contents to instruct cargo to use the arm-none-linux-guneabihf-gcc to be used as linker
[target.armv7-unknown-linux-gnueabihf]
linker = "arm-none-linux-gnueabihf-gcc"
With all of the mentioned changes in place, the build can be performed using
cargo build --release --toolchain armv7-unknown-linux-gnueabihfThe output binary will be in target/armv7-mistra-linux-gnueabihf/release directory and it can be copied to the SD card
image.
Yocto integration
Instead of using a pre-built toolchain, we can build a toolchain using Yocto, or let Yocto and bitbake build app for
us.
The changes for both approaches are in the meta-mistra repository.
Rust SDK
Before our toolchain can be used for Rust cross-compilation, Rust support has to be added. It is done by adding the
following lines to the mistra-image.bb recipe
TOOLCHAIN_HOST_TASK:append = "\
 nativesdk-rust \
 nativesdk-cargo \
"

SDK_TOOLCHAIN_LANGS:append = " rust"
The SDK is built using
bitbake mc::mistra-image -c populate_sdkOnce SDK is build, we can install it (same as it is done in the first custom peripheral userspace application post)
The cross-compilation is done by sourcing the environment and then running cargo build. The environment script takes
care of setting the correct environment variables and settings.
. /opt/mistra-framebuffer/4.0/environment-setup-cortexa8t2hf-neon-mistra-linux-gnueabi
cargo build --release
After build command the output binary can be found in target/armv7-mistra-linux-gnueabihf/release directory and can be
copied to the SD card image for testing.
Yocto Rust recipe
We can also let bitbake perform the build for us. All we need is a proper recipe.
The recipe can be auto-generated from the crate source using cargo bitbake.
Info
Make sure that description and repository fields in Cargo.toml are populated, otherwise it will fail.
cd sens-apps-rs
cargo bitbake
Wrote: sens-apps_1.0.0.bbTip
The resulting recipe lists all the dependencies, but it does not list the SHA256 checksum values for them. The easiest
way to add those values is to let bitbake fail and print the list for you.
bitbake mc::mistra-swupdate...
ERROR: sens-apps-1.0.0-r0 do_fetch: Missing SRC_URI checksum, please add those to the recipe:
SRC_URI[android-tzdata-0.1.1.sha256sum] = "e999941b234f3131b00bc13c22d06e8c5ff726d1b6318ac7eb276997bbb4fef0"
SRC_URI[android_system_properties-0.1.5.sha256sum] = "819e7219dbd41043ac279b19830f2efc897156490d7fd6ea916720117ee66311"
SRC_URI[anyhow-1.0.98.sha256sum] = "e16d2d3311acee920a9eb8d33b8cbc1787ce4a264e85f964c2404b969bdcd487"
SRC_URI[async-broadcast-0.7.2.sha256sum] = "435a87a52755b8f27fcf321ac4f04b2802e337c8c4872923137471ec39c37532"
SRC_URI[async-channel-2.3.1.sha256sum] = "89b47800b0be77592da0afd425cc03468052844aff33b84e33cc696f64e77b6a"
SRC_URI[async-executor-1.13.2.sha256sum] = "bb812ffb58524bdd10860d7d974e2f01cc0950c2438a74ee5ec2e2280c6c4ffa"
...This list can be copied straight to the sens-apps_1.0.0.bb
After the checksums for depending crates are added, the compilation will go through and the built executable will be
placed in the /usr/bin/ directory of the target rootfs.
QEMU Testing
Once the app is built and deployed, the QEMU can be started.
There are no command-line options, so just running sens-apps will start printing the data.
Behind the scenes all peripherals will be configured on initialization and then data collected. This can be validated by running peripherals with tracing, so data is printed when configuration changes are made.
Summary
I am happy I was able to make something in Rust that integrates well with the rest of the blog and that works, and I will continue improving in that direction.
There are probably many ways this can be improved from the pure Rust perspective, but from the SW architect perspective I can see a few things that would be nice to have for a more complete example:
- accepting input arguments for selection of peripherals to be used; not all three have to be used all the time,
- periodic reporting from the main task instead of just pushing data as soon as it is received; this would require some kind of storage, perhaps also a database for being able to get some time series data,
- nice terminal ui with handling key presses,
- unit testing